
I have bunting on the brain at the moment; my head is filled with ideas on how to make seriously gorgeous, yet oh-so-easy-peasy garlands of decorative goodness. I'm starting this mini series of bunting how-tos with a tutorial on how to crochet some granny bunting. I use the term granny, as it refers to the style of crochet technique used to make the ubiquitous Granny Square - famous in every 1970s crochet afghan throw. It is a super easy and versatile technique which lends itself just as well to straight rows, chevrons, rounds, hexagons and triangles

This is a great stash busting project as you can make it as multicoloured as you wish, changing colour at the beginning of each row. It works best if you use the same colour yarn for the final round as well as for the top row that joins all the flags together. In this tutorial I will be using the method of creating half a square motif - always handy to get your head around for when you are making blankets or other items that may require halves of your main block to fill in gaps on edges

This pattern is written in UK crochet terminology, so to assist my lovely friends from the US here is a quick translation guide:
sc (single crochet) = ss (slip stitch) in US
dc (double crochet) = sc (single crochet) in US
htr (half treble) = hdc (half double crochet) in US
tr (treble) = dc (double crochet) in US
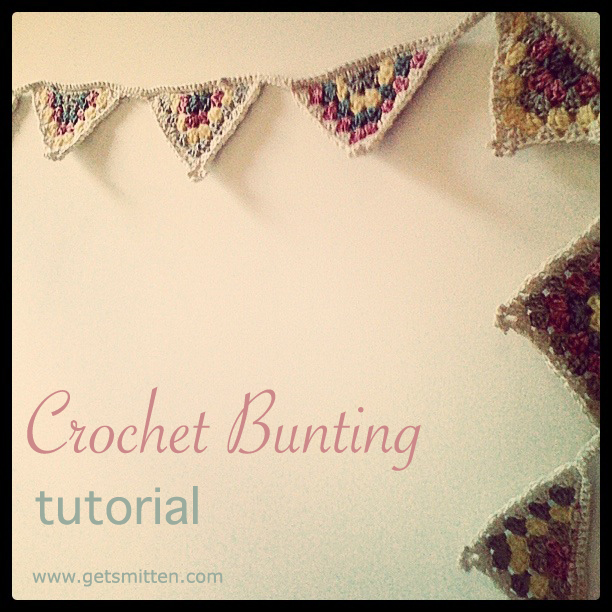
Get Smitten Crochet Granny Bunting!
Begin by creating a magic ring and work 3ch (represents 1tr), 3tr, 1ch, 4tr into it, fasten off leaving a 5cm / 2" tail
ch3 (represents 1tr), then 3tr into the same stitch, skip 3tr, work (3tr, 1ch, 3tr) into the space, skip 3tr, 4tr into last tr of previous row, fasten off leaving a 5cm / 2" tail
ch3 (represents 1tr), then 3tr into the same stitch, skip 3tr, 3tr into next space, skip 3tr, work (3tr, 1ch, 3tr) into the space, skip 3tr, 3 tr into the next space, 4tr into last tr of previous row, fasten off leaving a 5cm / 2" tail
Repeat this row, working 3tr into the spaces and (3tr, 1ch, 3tr) into the central 1ch space, until you have 4 rows. Don't forget to change colour for each row!

For the final round - remember this looks best if you use the same yarn as the one you will use to join all the granny flags together - we are going to add a decorative picot to the centre point as follows. ch3 (represents 1tr), then 3tr into the same stitch, (skip 3tr, 3tr into next space) 3 times, skip 3tr, work (3tr, 3ch, sc into the 3rd ch from hook, 5ch, sc into 5th ch from hook, 3ch, sc into the 3rd ch from hook, 3tr) into the 1ch space, (skip 3tr, 3tr into next space) 3 times, 4tr into last tr of previous row, fasten off leaving a 5cm / 2" tail

Repeat the above until you have as many flags as you want for the length of your bunting - I made 8. This is where you can add some variety to your bunting by mixing up the colour order on the rows each time. I used 4 colours to make mine and changed the order they appeared in on each of the 8 flags (but always keeping the final row the same colour for continuity). If you don't like the idea of changing colour too much, why not make each flag in one colour? You could use a bold 2 colour combo for a nautical look, a graded version of one colour for an on trend, ombre effect, or how about a rainbow if you added on another 3 rows to accommodate all 7 colours? I am going to make a red, white and blue version next for the Queen's Jubilee celebrations!

To join your flags together, and using the same yarn as for your final row with the picot detail, start by ch25, and with the back of the flag facing you, insert the hook into the first loop of the 3tr post on your first flag and make a dc (what we are going to do here is work across the top of our flags, using the loops of the trebles that are now lying on their sides). Work 1dc evenly across the length of your flag into each available loop - numbers are not important here, just try to keep it looking evenly spaced. It looks best if you work into a loop rather than simply over the whole treble as it lies on its side, otherwise it can look a bit too holey.
Tip: as you work this row, dc over the coloured ends from all the other rows as you go, it will save you a lot of time darning in the ends later! You can snip them shorter once you have dc'd over them a few times, to make it less bulky

When you reach the end of the first flag, ch6, then join your second flag as above. Continue in this manner until all your flags are joined with a dc across the top and 6ch inbetween. ch26 and turn the work so that the right side of the flags are now facing. dc into 2nd ch from the hook and then continue to dc all the way along the length of your previous row, fasten off and darn in the ends

Voila! Your granny bunting is now ready to adorn your home or garden ~ enjoy!
Lisa x
p.s if you use this pattern and you'd like to showcase your finished item, feel free to upload a photo of it to my Get Smitten Flickr group or the Get Smitten Facebook page where you can join in the chatter and keep up to date with what goes on at Get Smitten here in France - I'd love to see you there and say hi!
And if you're currently addicted to Instagram as I am, feel free to tag a photo of your bunting to #getsmitten @lisapocklington
{all images © Lisa Pocklington for Get Smitten using Instagram}


Love the traditional granny look! This is super cute. Wonderful job and thanks for the free pattern.
ReplyDeleteAwesome Lisa! how clever you are! I'll definitely be giving these a try.
ReplyDeleteI'm thinking along the lines of some 'yarn bombing bunting.....', last year was such a blast . Do you have any ideas yet? stupid question, off course you do.
I still have lots of hand spinning and dying yarn(using natural products like onions and beetroots) milling around in my head, have you ever tried? any tips for me?
Wauw!! Will be trying this soon.. (Found it on Pinterst)
ReplyDelete