Showing posts with label crochet. Show all posts

Thursday, 6 September 2012

*Designer* - FREE Crochet iPad Cover Tutorial


Want to glam up your iPad? I'm a big believer in making practical things pretty, and if it gives me the excuse to whip my crochet hook out, then all the better as far as I'm concerned! I was playing around with stitch combinations after flicking through a vintage pattern book and my favourite feeds on Instagram and this is what I came up with; it's a basic ripple and fan stitch that uses colour and ridged texture for maximum effect. And this is my current colour obsession: grey, silver and blush


For this project you will need
  • 1 ball each of dk yarn in your choice of colours (I chose 3 and alternated them every 2 rows but you could have as many or as few as you wish. You could even change to a new colour every pattern repeat - rows 3-6 - as shown in the lower sample of the image below and use this as a stash busting project!)
  • 1 crochet hook size 3.5mm or E
  • a large eyed yarn needle to sew up the side at the end
    Please note that this tutorial uses British crochet terminology throughout, so here is a quick translation guide for any of my lovely US friends who wish to make one too!

    dc (double crochet) = sc (single crochet) in US
    tr (treble) = dc (double crochet) in US
    dtr (double treble) = tr (treble) in US


    Let's get started!
    Note: rows 1 and 2 form the ripple shape and rows 3-6 are the pattern repeat. I changed colour every 2 rows in my sequence of 3 colours. I worked into the back loops only with each colour change to enhance the pattern and create a raised, textured effect. The tutorial below instructs for this but you can ignore these extra bits if you like and work to your own colour sequence or keep the work flat rather than raised. The choice is yours!

    For your foundation row ch91
    1. dc in 2nd ch from hook, dc in next 3sts, *3dc in next st, dc in next 8sts. Repeat from * 8 times, 3dc in next st, dc in next 4sts to end. ch1 turn

    2. Skip first dc, *dc into next 4sts, 3dc into next st, dc into next 4sts, skip 2sts. Repeat from * to end. ch1 turn


    3. slst into next 3sts, {change colour here as shown in image above} ch3 (represents a treble) then working into back loops only, tr into next 2sts, *3dtr into next st, tr into next 3sts, skip 4sts, tr into next 3sts. Repeat from * to end. ch1 turn

    4. dc in next 4sts, *3dc in next st, dc in next 8sts. Repeat from * to end. ch1 turn

    5. {change colour here} Working into the back loops only, skip 1st st, *dc in next 4sts, 3dc in next st, dc  in next 4sts, skip 2sts. Repeat from * to end. ch1 turn

    6. Repeat row 5 but work into both loops

    7. Repeat rows 3-6 until the work measures 29cm - ideally ending in the same colour as the first row


    To make up
    • Darn in any ends from your colour changes (tip: I crochet over the ends of my colour changes as I go, in order to save myself this tedious task - you should try it!) and block press the work gently with an iron 
    • Fold the work in half with right sides facing and using the corresponding colour yarn, dc along the bottom edge
    • Take a length of the same yarn with the yarn needle and sew the side edge together using a back st. I followed the line of the narrowest part of the ripple width so that the edge remains straight
    • Sew in the ends, turn the cover right side out and slip it over your iPad!
    et voila! One incredibly gorgeous and rather glamorous, crochet iPad cover!


    What colours did you use? How did you work your stripe combination or did you use just one colour? I'd love to see what you made... please come on over to the Get Smitten Facebook Page and show me your work. We can all ooh and aaah over your scrummy crochet goodness and we can connect over all things crochet, handmade and vintage!

    And whilst you're there, would you mind hitting the 'Like' button too? I would hugely appreciate your support, feedback and suggestions for other patterns for the Get Smitten library. Plus, you'll be the first to hear about any new pattern releases and other fun projects that I organise


    And if you happen to be reading this and are unable to crochet or simply don't have the time to rustle an iPad cover up yourself, you can always place an order for your very own one made by me! Pop over to my Etsy store here and we can discuss your perfect colour choice. It would make a great Christmas prezzie or back to uni gift: just sayin'!

    Plus, I really love to make them! It keeps me out of mischief!

    Lisa x

    {all images by Lisa Pocklington using Instagram Please respect intellectual property and do not sell this pattern. You are welcome to spread the word about this pattern tutorial far and wide providing you link back to this page and credit me as the designer. I hugely appreciate your honesty, thanks!}

    Friday, 11 May 2012

    Crochet Bunting Tutorial


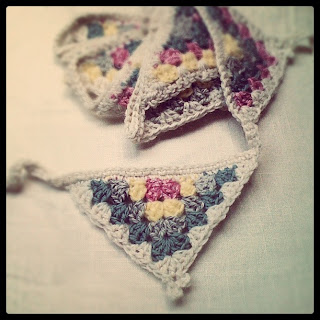
    I have bunting on the brain at the moment; my head is filled with ideas on how to make seriously gorgeous, yet oh-so-easy-peasy garlands of decorative goodness. I'm starting this mini series of bunting how-tos with a tutorial on how to crochet some granny bunting. I use the term granny, as it refers to the style of crochet technique used to make the ubiquitous Granny Square - famous in every 1970s crochet afghan throw. It is a super easy and versatile technique which lends itself just as well to straight rows, chevrons, rounds, hexagons and triangles


    This is a great stash busting project as you can make it as multicoloured as you wish, changing colour at the beginning of each row. It works best if you use the same colour yarn for the final round as well as for the top row that joins all the flags together. In this tutorial I will be using the method of creating half a square motif - always handy to get your head around for when you are making blankets or other items that may require halves of your main block to fill in gaps on edges


    This pattern is written in UK crochet terminology, so to assist my lovely friends from the US here is a quick translation guide:

    sc (single crochet) = ss (slip stitch) in US
    dc (double crochet) = sc (single crochet) in US
    htr (half treble) = hdc (half double crochet) in US
    tr (treble) = dc (double crochet) in US

    Get Smitten Crochet Granny Bunting!

    Begin by creating a magic ring and work 3ch (represents 1tr), 3tr, 1ch, 4tr into it, fasten off leaving a 5cm / 2" tail

    ch3 (represents 1tr), then 3tr into the same stitch, skip 3tr, work (3tr, 1ch, 3tr) into the space, skip 3tr, 4tr into last tr of previous row, fasten off leaving a 5cm / 2" tail

    ch3 (represents 1tr), then 3tr into the same stitch, skip 3tr, 3tr into next space, skip 3tr, work (3tr, 1ch, 3tr) into the space, skip 3tr, 3 tr into the next space, 4tr into last tr of previous row, fasten off leaving a 5cm / 2" tail

    Repeat this row, working 3tr into the spaces and (3tr, 1ch, 3tr) into the central 1ch space, until you have 4 rows. Don't forget to change colour for each row!


    For the final round - remember this looks best if you use the same yarn as the one you will use to join all the granny flags together -  we are going to add a decorative picot to the centre point as follows. ch3 (represents 1tr), then 3tr into the same stitch, (skip 3tr, 3tr into next space) 3 times, skip 3tr, work (3tr, 3ch, sc into the 3rd ch from hook, 5ch, sc into 5th ch from hook, 3ch, sc into the 3rd ch from hook, 3tr) into the 1ch space, (skip 3tr, 3tr into next space) 3 times, 4tr into last tr of previous row, fasten off leaving a 5cm / 2" tail


    Repeat the above until you have as many flags as you want for the length of your bunting - I made 8. This is where you can add some variety to your bunting by mixing up the colour order on the rows each time. I used 4 colours to make mine and changed the order they appeared in on each of the 8 flags (but always keeping the final row the same colour for continuity). If you don't like the idea of changing colour too much, why not make each flag in one colour? You could use a bold 2 colour combo for a nautical look, a graded version of one colour for an on trend, ombre effect, or how about a rainbow if you added on another 3 rows to accommodate all 7 colours? I am going to make a red, white and blue version next for the Queen's Jubilee celebrations!


    To join your flags together, and using the same yarn as for your final row with the picot detail, start by ch25, and with the back of the flag facing you, insert the hook into the first loop of the 3tr post on your first flag and make a dc (what we are going to do here is work across the top of our flags, using the loops of the trebles that are now lying on their sides). Work 1dc evenly across the length of your flag into each available loop - numbers are not important here, just try to keep it looking evenly spaced. It looks best if you work into a loop rather than simply over the whole treble as it lies on its side, otherwise it can look a bit too holey.

    Tip: as you work this row, dc over the coloured ends from all the other rows as you go, it will save you a lot of time darning in the ends later! You can snip them shorter once you have dc'd over them a few times, to make it less bulky


    When you reach the end of the first flag, ch6, then join your second flag as above. Continue in this manner until all your flags are joined with a dc across the top and 6ch inbetween. ch26 and turn the work so that the right side of the flags are now facing. dc into 2nd ch from the hook and then continue to dc all the way along the length of your previous row, fasten off and darn in the ends


    Voila! Your granny bunting is now ready to adorn your home or garden ~ enjoy!

    Lisa x

    p.s   if you use this pattern and you'd like to showcase your finished item, feel free to upload a photo of it to my Get Smitten Flickr group or the Get Smitten Facebook page where you can join in the chatter and keep up to date with what goes on at Get Smitten here in France  - I'd love to see you there and say hi!

    And if you're currently addicted to Instagram as I am, feel free to tag a photo of your bunting to #getsmitten @lisapocklington
      

    {all images © Lisa Pocklington for Get Smitten using Instagram}


    Wednesday, 9 May 2012

    *Designer* - New Retro Soft Toy Pattern at Get Smitten


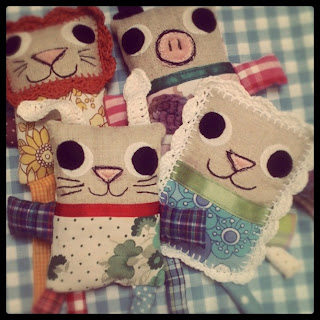
    Let me introduce to Rory Lion and his friends! They love to have fun adventures together and are inseparable, which is why I have included the step by step instructions to make all four members of the gang in my latest pattern release at Get Smitten!

    Rory is quite bossy; the leader of the gang. He is caring, loyal and loves to dance and sing. He goes out of his way to be centre of attention and his favourite crisps (that's potato chips to my American friends) are Cheese and Onion flavour

    Barney Lamb is happy-go-lucky and follows Rory wherever he goes. He is very good at Maths and jumping and he loves remote controlled cars. One day he would like to visit New Zealand

    Squealia Piglet is very excitable and has to fight the urge to squeal nearly all the time. She loves arts & crafts and sometimes gets in a right mess with all her paints & crayons. Her favourite colour is pink and she has a very curly, spiral crocheted tail!

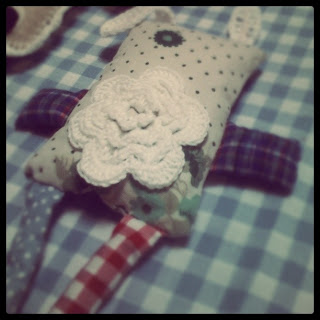
    Miss Bunnie-Penny is quite timid but very, very caring. She is helpful & kind and is always available for cuddles. You can tell her all your worries & she will make you feel better just by being there. She dreams of having her own chat show like Oprah & she loves lollipops. She has the most beautiful tail you ever saw on a rabbit


    I had great fun designing these guys - I wanted to capture the carefree innocence of childhood friendships and have their expressions reflect this. I love the naivety of their faces, both in terms of expression and in construction - the large eyes appeal to younger kids and the long gangley limbs give little hands something to hold on to. I kept the shape simple so that sewists of all ages and experience could make them and the pattern can be made by hand or machine, as there are no difficult sections to trip you up. The character of the animals is added with crochet details and the pattern contains full step by step instructions on how to make these defining elements


    I also wanted to give Rory and his buddies a kitschy, retro vibe - like the kind of toys I remember seeing in my Mum's crafting books of the 70s. I have used a selection of mismatched vintage fabrics with bold floral patterns to help achieve this look. If you want to do the same, you'll find a great selection of vintage fabric fat quarters here
    Preview


    I recommend adding a little bit of lavender to the body just before you stuff it so that the toy has a calming and relaxing affect on children at bedtime - the scent is released as you give your cute, new friend a good night hug!

    The pattern is available at the bargain price of €5.00 in my Get Smitten Etsy store right here

    Happy sewing!

    Lisa xx

    p.s  if you happen to make any of these guys from my pattern, you are most welcome to upload your photos to my Get Smitten Flickr group or my Get Smitten Facebook page so that we can all get a load of the cuteness!

    {all images © Lisa Pocklington for Get Smitten using Instagram on iphone 3G}


    Sunday, 1 April 2012

    *FREE* Crochet Easter Bunny Pattern


    There's just enough time left before Easter to grab your crochet hook and some oddments of wool and whiz up a bundle of these easy-peasy, slightly bonkers looking Easter bunnies. There are two types to make, the fat bottom bunny and the long tall bunny and the instructions for both are found below. Please note that the instructions are given in UK crochet terms but to help out all my lovely American friends, here's a quick translation guide..

    dc (double crochet) = sc (single crochet) in US
    htr (half treble) = hdc (half double crochet) in US
    tr (treble) = dc (double crochet) in US


    For this project you will need:


    oddments of yarn that is 100% wool content (this is so that it will felt)
    toy stuffing
    small buttons
    embroidery thread for face details

    Fat Bottom Bunny


    ch12 into a magic ring (as above)
    Round 1. ch1 and dc into same space, 2dc in each st, slst to first ch = 24
    Round 2. ch1, dc in next 2sts, 2dc in next st, *dc in next 3sts, 2dc in next st. Repeat from * to end of round, slst to first ch = 30
    Round 3. ch1, dc into back loops only of all sts, slst to first ch
    Round 4-6. as round 3
    Round 7. ch1, dc in next 2 sts, dec 2sts, *dc in next 3sts, dec 2sts. Repeat from * to end of round, slst into first ch = 24
    Round 8-10. ch1, dc into each st, slst to first ch
    Round 11. ch1, dc, dec 2sts, *dc in next 2sts, dec 2sts. Repeat from * to end of round, slst into first ch = 18
    Round 12-14. ch1, dc into each st, slst to first ch
    Round 15. ch1, dec 2sts, *dc, dec 2sts. Repeat from * to end of round, slst to first ch = 12
    Fasten off leaving approx 30cm tail to use for stitching ears on later

    Long Tall Bunny
    ch10 into a magic ring
    Round 1. ch1, 2dc into next st, *dc, 2dc into next st. Repeat from * to end of round, slst to first ch = 15


    Round 2. ch1, dc into back loops only of each st (as above), slst to first ch
    Round 3-15. ch1, dc into each st, slst to first ch
    Round 16. ch1, dc into next 2sts, dec 2sts, *dc into next 3sts, dec 2sts. Repeat to end of round, slst to first ch
    Round 17. as round 3. Fasten off leaving approx 30cm tail to use for stitching ears on later

    Ears - make 2 per bunny!
    ch15 for the foundation row, turn


    Working into back loops only, continue as follows: dc into 2nd ch from hook, 1htr into next 5sts, 1tr into next 4sts, 1htr, dc2, 3dc in last st then continue back along the remaining loops of the foundation row. (tip: crochet over the loose end so you don't have to darn it in later!)  dc2, 1htr, 1tr into next 4sts, 1htr into next 5sts, dc into last st then slst to first dc, fasten off leaving a 10cm tail for sewing to body later


    To make up your bunny:
    1. Stuff the body of your bunny with some toy stuffing and position the ears in the slot at the top. Using the yarn tail, sew the ears in place with a simple running st


    2. Pop your bunny into the washing machine (it's ok to go in with your clothes as long as the colours are similar!) and run through a 60+ degree wash to felt the wool. Alternatively you can do this step by hand if you dampen the bunny with some hot water and rub some liquid soap into it, rolling and shaping as you go. It is the combination of hot water, soap and friction which creates the felting process


    3. Dry the bunny thoroughly either on a radiator, tumble dryer or in the sun!
    4. For the fluffy tail, make a small pompom with some white yarn and stitch it to the back of the bunny (tip: wrap the yarn around a fork or a piece of card, then slide it off and tie a length of same yarn around the middle to secure it. Cut the loop ends and fluff it all up!)


    5. Using embroidery thread, stitch on two buttons for eyes and a little cross (Miffy style!) for the mouth


    Have fun giving your bunnies character by adding extra details such as a ribbon bow or some lace flowers, or even some stripes as you crochet. You can also play around with the height of the bunnies by either adding or subtracting the amount of rounds that don't have any increase or decrease stitches. Get creative and have fun... but watch out, they are addictive!!


    Wishing you a wonderful, chocolatey, bunny filled Easter!

    Lisa x

    {all photos by Lisa Pocklington for Get Smitten using Instagram}

    Credit: this project was inspired by the knitted bunnies by Claire Garland of Dot Pebbles which appeared on the fab Mollie Makes blog recently - hop on over there for her free pattern if you are more of a knitting fan. I created my version of the simple bunnies as I can't knit for toffee!

    Thursday, 22 March 2012

    Spring is in the Air!


    Yes, even here in the French Alps, Spring is in the air... and with it comes that icy nip that has you reaching for something warm even though you are keen to burst your Springtime wardrobe into action!

    Before things launch right into Easter, I thought I'd share with you my Get Smitten pattern from February - the lovely crochet cowl and neck warmer which features two patterns for the price of one! The pattern repeat is simple - ideal for advanced beginners and experts alike - and the overall effect is elegant and sophisticated with minimal effort; you'll love working this design


    The lightweight version is perfect for these in-between months to keep that chillly biting wind at bay - use a floaty, mohair yarn for a light-as-a-feather, ethereal and delicate neck warmer. There are some delicious colours out for this season in turquoise, coral and soft grey

    The chunky version is a real snuggler and looks lovely over your favourite jumper, denim jacket or winter dress. Worked in super chunky yarn, it grows in no time and makes a great gift


    As with all pdf patterns from the Get Smitten pattern library, there are full written instructions on how to make both the lightweight and the chunky versions of the cowl, along with photos to help you know you are on the right track. Anyone who has participated in any of my creative workshops will testify to my thorough, step by step instructions; I'd hate for you to have any frustrations and not complete your project. I'm a strong believer in Achievment = Motivation


    For this project you will need:

    * 200g of super chunky yarn and / or 1 ball of mohair yarn

    * size 12mm (US O/16) and / or size 10mm (US N/15) crochet hooks

    * a yarn needle to darn in the ends

    *a copy of the Get Smitten Crochet Cowl Neckwarmer pdf pattern


    You can get started straight away with your Spring neck warmer by grabbing a copy of the pdf pattern in my Etsy store here - and if you don't crochet and would like me to make one for you, please contact me for more info! I absolutely love making these cowls

    March's pattern is underway - you'll love this one too as it features a good friend of the Easter Bunny! Stay tuned, until then, stay warm!

    Lisa x

    {photos by Lisa Pocklington for Get Smitten, using Instagram!}

    Sunday, 22 January 2012

    *Designer* - New Sewing & Crochet Pattern by Get Smitten. Let it Snow!


    We are experiencing massive snow storms here in the French Alps - the size of the snowflakes on Saturday night were the biggest I've ever seen.... like giant feathers, silently floating to earth; it was magical!

    It is a happy coincidence then, that the latest pattern from my Get Smitten studio is all about having snow-fall on demand from the prettiest cloud in town. I launched the Let it Snow! cloud mobile pattern earlier this week on Etsy so I thought I'd let you know about it too!


    I have committed to launching a new Get Smitten pattern each month throughout 2012 - so watch this space for updates and news..... and to keep me accountable to achieve that goal!

    All my Get Smitten patterns are available in downloadable pdf format and contain full, detailed instructions on how to make each item. I take you step by step through the process as if you were on one of my creative workshops and provide close up photos to help you deal with any tricky parts. In fact those of you who have attended any of my creative workshops will know the level of detail and extra helpful information I put in my hand-outs!


    The Let it Snow! cloud mobile is a super simple sewing pattern - complete with cloud template - which looks gorgeous made up in any of my Get Smitten vintage fabrics. All you need is...

    * 1 fat quarter of vintage fabric

    * some ribbon

    * 1 skein of embroidery cotton

    * a crochet hook

    * pre-made mini pompoms or felted balls

    * stuffing

    ....and it really should only take you a few hours to make {honest!}


    The photos were taken a few days before this latest fresh dump of snow and it was about ten degrees below zero... seriously chilly stuff, we didn't stick around too long I can tell ya! I had wanted to wear my funky blue Mary Jane shoes with this outfit but there was no way my little tootsies would ever have survived! Fur lined boots were a much wiser choice! I'm also loving my new grey lace tights and denim blue nails; do you like?

    The tiny pompoms used here were actually cut from some upholstery trim I had (in fact they were the inspiration for this sweet creation!) but you can buy pre-made ones in most craft stores or even have a go at making your own. My friend Samantha has written a great tutorial on how to make felt balls on her blog


    I hope you like the first pattern release of the year, I am excited to get started on February's one already. I'll release it early on in the month as it will be Valentine related and you'll need time to get busy on it ready for the 14th!

    Do you have snow where you are? Do you still get excited when the first flakes fall?

    Lisa x

    Monday, 5 September 2011

    Je crochet, tu crochet... nous crochetons?


    I often find myself reaching for solace in a magazine on a rainy weekend - so this Saturday I treated myself to an issue of French yarn mag Phildar. (I told you I was obsessing over yarns!) I guess it was a combined lure of the bright colours on the cover and the fact that this issue boasted a whole bunch of crochet projects!

    The magazine is a summer edition so I will be adapting the yarn choice to make them work for this fast approaching Autumn / Winter season. I have a ton of soft beige mohair to use up and so will ease myself back into the world of knit with this simple, flowing cardi


    I reclaimed the yarn from a huge Alpaca jumper last winter, it is a lovely caramel colour and so I think I'll make it up into the lace effect waistcoat, below, which I'll be wearing over my new, knitted, navy sweater dress, nipped in at the waist with a giant, tan leather belt.  I have a long train journey coming up next week and this will be the perfect travel project!


    This is possibly the project that swung the purchase for me... I love the effect of waves in crochet, especially when using different textured yarn and have been wondering how to incorporate some deep blue, glittery yarn I came across last summer into a project. I'm thinking of teaming it with grey & silver... not yet decided on the accent colour as yet. It will involve a lengthy delve into the depths of my supplies!


    So feeling all inspired and pleased with myself I sat making these decisions over a nice cup of tea in the dry warmth of my lounge... and then it hit me.  
    All the instructions are in French!  

    Now, a crochet pattern looks scary enough on first sight at the best of times, but throw in the added complication of a foreign language and there is sure to be some head scratching going on! Not to mention quite a bit of un-doing and re-doing... ooh la la!

    But I'm up for this challenge; in fact I'm so totally ready for this challenge I can hardly wait until my train journey next week to begin. You see, I have been planning (and chickening-out) of running my crochet & sewing workshops as bilingual sessions for some time. My French is good, but teaching in French to the French has always seemed a bit too scary... I mean, teaching in your own language can be tricky enough when you need to find alternate ways of explaining something until that wondrous "a-ha" light-bulb moment arrives for the student.

    So, now it's my turn to be the student again - seems like perfect timing what with all the kids returning to school this week! I'm excited and nervous all at the same time. I'm looking forward to enhancing my vocabulary, learning new terms of phrase and experiencing that joyful eureka moment of success! And most of all I'm excited to be pushing my comfort zone and finally having the confidence to take Get Smitten Creative Workshops to the next level!

    Wish me luck!

    Lisa x

    {images by Phildar from issue 50 of Phildar magazine - you can flick through the whole issue online here}

    p.s - 'crochet' means 'hook' in French, however, it is not a verb to be conjugated as implied in the blog title! You would actually say 'je fais du crochet' (I do crochet) as it is a pastime. Just sayin'!

    Thursday, 1 September 2011

    Smitten with September


    It's September right? Good; this means that I can officially start getting excited about knitwear and yarns. Not that I'm not excited about them for the rest of the year you understand, it's just that once September kicks in I am likely to have a few more people to share this passion with! Hurrah!

    I adore September - the crisp blue skies, the low but warm sun, the smell of Autumn approaching, the textures in nature and most of all the fact that you can snuggle into a cardi or drape yourself in a scarf whilst still wearing shorts!

    So what's on the cards at Get Smitten then? I hear you cry. Well, the Get Hooked! learn to crochet workshops will commence, followed by a short series of workshops in which we will make some small items... I'm currently working on the designs right now and have selected the perfect tweedy yarn for one of them already!

    Local boutiques will take stock of my latest range of hand crocheted beanies - there's plenty of sparkle, texture and floppiness to be seen this year

    There will be online tutorials for crochet projects - hopefully with video! (gulp!)

    I will be harvesting yarn from pre-loved garments, brocantes and charity shops to use in my work

    And for personal happiness I will be adding the finishing rounds to my utterly gorgeous crochet blanket, trying my hand at crocheting socks (not sure why but feel I ought to give it a go!) and dusting off the knitting needles to make myself a cashmere cardigan from a vintage pattern

    Nothing too ambitious there then!

    Naturally, I'll keep you in the loop (crochet pun intended!) with my yarn adventures and hopefully inspire you to have a go yourself. It's easier than you think! You'll love it, I promise

    Lisa x

    {image by Funkyarns - visit their etsy store for the most gorgeous hand-dyed yarns you've ever seen!}

    Tuesday, 5 April 2011

    *FREE* Pattern for Crochet Easter Eggs

    I was designing a simple project for the lovely ladies in my Get Hooked workshops to teach them how to increase and decrease in crochet when I came over all generous and thought I'd share the pattern here for you to try yourself! This is a really simple project, perfect for using up small scraps of coloured yarn and hopefully I've left you plenty of time to get them finished in time for Easter!

    You will need:
    • oddments of yarn and corresponding size crochet hook (I used double knit yarn and a size 4mm hook)
    • small amount of stuffing material
    • yarn needle to darn in ends
    • ribbons, beads and buttons to decorate
    Please note that instructions are written in UK crochet terminology (but to help out my lovely American friends a UK dc is a US sc!)

    Round 1: make a magic ring and 8dc into it. Pull the short end tight and slst into the 1st dc
    Round 2: 1ch (represents 1st dc), 1dc into the same space, *1dc into next st, 2dc into next st. repeat from * to end of round & slst to close
    Round 3: ch1, 1dc into same space, *1dc into next 2 sts, 2dc into next st. repeat from * to end of round and slst to close
    Round 4: ch1, 1dc into same space, *1dc into next 3 sts, 2dc into next st. repeat from * to end of round and slst to close
    Round 5: ch1, 1dc into same space, *1dc into next 4 sts, 2dc into next st. repeat from * to end of round and slst to close
    Round 6: ch1, 1dc into same space, *1dc into next 5 sts, 2dc into next st. repeat from * to end of round and slst to close
    Rounds 7-11: ch1, 1dc into each st to end of round and slst to close
    Round 12: dc2tog all the way round, slst to close
    Round 13: Insert stuffing then dc2tog all the way round, slst to close
    Round 14: dc2tog until gap is closed, cut end leaving enough to darn in and pull base into desired shape

    Attach a loop of embroidery thread or yarn to the top if you plan to suspend the eggs from branches


    Once you've mastered the basic shape (you are starting at the top of the egg, by the way!) you can start to incorporate stripes into the pattern simply by changing colours at the beginning of a new round. If this sounds too scary then why not try using a variegated yarn instead and let the colours form their own pattern?


    And when it comes to decorating your eggs with ribbons, buttons and beads; the only limit is your imagination. 

     I'd love to see the eggs you make with this pattern - feel free to add your photos to my Crochet Easter Egg gallery on Flickr!

    Lisa xx

    You are welcome to sell any crochet eggs you make using this free pattern but please respect copyright and do not sell the pattern on in any form without my permission. All images by Lisa Pocklington for Get Smitten

    Share this post with your friends!

    Related Posts with Thumbnails