Showing posts with label tutorial. Show all posts

Thursday, 6 September 2012

*Designer* - FREE Crochet iPad Cover Tutorial


Want to glam up your iPad? I'm a big believer in making practical things pretty, and if it gives me the excuse to whip my crochet hook out, then all the better as far as I'm concerned! I was playing around with stitch combinations after flicking through a vintage pattern book and my favourite feeds on Instagram and this is what I came up with; it's a basic ripple and fan stitch that uses colour and ridged texture for maximum effect. And this is my current colour obsession: grey, silver and blush


For this project you will need
  • 1 ball each of dk yarn in your choice of colours (I chose 3 and alternated them every 2 rows but you could have as many or as few as you wish. You could even change to a new colour every pattern repeat - rows 3-6 - as shown in the lower sample of the image below and use this as a stash busting project!)
  • 1 crochet hook size 3.5mm or E
  • a large eyed yarn needle to sew up the side at the end
    Please note that this tutorial uses British crochet terminology throughout, so here is a quick translation guide for any of my lovely US friends who wish to make one too!

    dc (double crochet) = sc (single crochet) in US
    tr (treble) = dc (double crochet) in US
    dtr (double treble) = tr (treble) in US


    Let's get started!
    Note: rows 1 and 2 form the ripple shape and rows 3-6 are the pattern repeat. I changed colour every 2 rows in my sequence of 3 colours. I worked into the back loops only with each colour change to enhance the pattern and create a raised, textured effect. The tutorial below instructs for this but you can ignore these extra bits if you like and work to your own colour sequence or keep the work flat rather than raised. The choice is yours!

    For your foundation row ch91
    1. dc in 2nd ch from hook, dc in next 3sts, *3dc in next st, dc in next 8sts. Repeat from * 8 times, 3dc in next st, dc in next 4sts to end. ch1 turn

    2. Skip first dc, *dc into next 4sts, 3dc into next st, dc into next 4sts, skip 2sts. Repeat from * to end. ch1 turn


    3. slst into next 3sts, {change colour here as shown in image above} ch3 (represents a treble) then working into back loops only, tr into next 2sts, *3dtr into next st, tr into next 3sts, skip 4sts, tr into next 3sts. Repeat from * to end. ch1 turn

    4. dc in next 4sts, *3dc in next st, dc in next 8sts. Repeat from * to end. ch1 turn

    5. {change colour here} Working into the back loops only, skip 1st st, *dc in next 4sts, 3dc in next st, dc  in next 4sts, skip 2sts. Repeat from * to end. ch1 turn

    6. Repeat row 5 but work into both loops

    7. Repeat rows 3-6 until the work measures 29cm - ideally ending in the same colour as the first row


    To make up
    • Darn in any ends from your colour changes (tip: I crochet over the ends of my colour changes as I go, in order to save myself this tedious task - you should try it!) and block press the work gently with an iron 
    • Fold the work in half with right sides facing and using the corresponding colour yarn, dc along the bottom edge
    • Take a length of the same yarn with the yarn needle and sew the side edge together using a back st. I followed the line of the narrowest part of the ripple width so that the edge remains straight
    • Sew in the ends, turn the cover right side out and slip it over your iPad!
    et voila! One incredibly gorgeous and rather glamorous, crochet iPad cover!


    What colours did you use? How did you work your stripe combination or did you use just one colour? I'd love to see what you made... please come on over to the Get Smitten Facebook Page and show me your work. We can all ooh and aaah over your scrummy crochet goodness and we can connect over all things crochet, handmade and vintage!

    And whilst you're there, would you mind hitting the 'Like' button too? I would hugely appreciate your support, feedback and suggestions for other patterns for the Get Smitten library. Plus, you'll be the first to hear about any new pattern releases and other fun projects that I organise


    And if you happen to be reading this and are unable to crochet or simply don't have the time to rustle an iPad cover up yourself, you can always place an order for your very own one made by me! Pop over to my Etsy store here and we can discuss your perfect colour choice. It would make a great Christmas prezzie or back to uni gift: just sayin'!

    Plus, I really love to make them! It keeps me out of mischief!

    Lisa x

    {all images by Lisa Pocklington using Instagram Please respect intellectual property and do not sell this pattern. You are welcome to spread the word about this pattern tutorial far and wide providing you link back to this page and credit me as the designer. I hugely appreciate your honesty, thanks!}

    Friday, 11 May 2012

    Crochet Bunting Tutorial


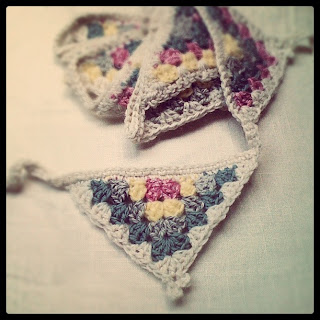
    I have bunting on the brain at the moment; my head is filled with ideas on how to make seriously gorgeous, yet oh-so-easy-peasy garlands of decorative goodness. I'm starting this mini series of bunting how-tos with a tutorial on how to crochet some granny bunting. I use the term granny, as it refers to the style of crochet technique used to make the ubiquitous Granny Square - famous in every 1970s crochet afghan throw. It is a super easy and versatile technique which lends itself just as well to straight rows, chevrons, rounds, hexagons and triangles


    This is a great stash busting project as you can make it as multicoloured as you wish, changing colour at the beginning of each row. It works best if you use the same colour yarn for the final round as well as for the top row that joins all the flags together. In this tutorial I will be using the method of creating half a square motif - always handy to get your head around for when you are making blankets or other items that may require halves of your main block to fill in gaps on edges


    This pattern is written in UK crochet terminology, so to assist my lovely friends from the US here is a quick translation guide:

    sc (single crochet) = ss (slip stitch) in US
    dc (double crochet) = sc (single crochet) in US
    htr (half treble) = hdc (half double crochet) in US
    tr (treble) = dc (double crochet) in US

    Get Smitten Crochet Granny Bunting!

    Begin by creating a magic ring and work 3ch (represents 1tr), 3tr, 1ch, 4tr into it, fasten off leaving a 5cm / 2" tail

    ch3 (represents 1tr), then 3tr into the same stitch, skip 3tr, work (3tr, 1ch, 3tr) into the space, skip 3tr, 4tr into last tr of previous row, fasten off leaving a 5cm / 2" tail

    ch3 (represents 1tr), then 3tr into the same stitch, skip 3tr, 3tr into next space, skip 3tr, work (3tr, 1ch, 3tr) into the space, skip 3tr, 3 tr into the next space, 4tr into last tr of previous row, fasten off leaving a 5cm / 2" tail

    Repeat this row, working 3tr into the spaces and (3tr, 1ch, 3tr) into the central 1ch space, until you have 4 rows. Don't forget to change colour for each row!


    For the final round - remember this looks best if you use the same yarn as the one you will use to join all the granny flags together -  we are going to add a decorative picot to the centre point as follows. ch3 (represents 1tr), then 3tr into the same stitch, (skip 3tr, 3tr into next space) 3 times, skip 3tr, work (3tr, 3ch, sc into the 3rd ch from hook, 5ch, sc into 5th ch from hook, 3ch, sc into the 3rd ch from hook, 3tr) into the 1ch space, (skip 3tr, 3tr into next space) 3 times, 4tr into last tr of previous row, fasten off leaving a 5cm / 2" tail


    Repeat the above until you have as many flags as you want for the length of your bunting - I made 8. This is where you can add some variety to your bunting by mixing up the colour order on the rows each time. I used 4 colours to make mine and changed the order they appeared in on each of the 8 flags (but always keeping the final row the same colour for continuity). If you don't like the idea of changing colour too much, why not make each flag in one colour? You could use a bold 2 colour combo for a nautical look, a graded version of one colour for an on trend, ombre effect, or how about a rainbow if you added on another 3 rows to accommodate all 7 colours? I am going to make a red, white and blue version next for the Queen's Jubilee celebrations!


    To join your flags together, and using the same yarn as for your final row with the picot detail, start by ch25, and with the back of the flag facing you, insert the hook into the first loop of the 3tr post on your first flag and make a dc (what we are going to do here is work across the top of our flags, using the loops of the trebles that are now lying on their sides). Work 1dc evenly across the length of your flag into each available loop - numbers are not important here, just try to keep it looking evenly spaced. It looks best if you work into a loop rather than simply over the whole treble as it lies on its side, otherwise it can look a bit too holey.

    Tip: as you work this row, dc over the coloured ends from all the other rows as you go, it will save you a lot of time darning in the ends later! You can snip them shorter once you have dc'd over them a few times, to make it less bulky


    When you reach the end of the first flag, ch6, then join your second flag as above. Continue in this manner until all your flags are joined with a dc across the top and 6ch inbetween. ch26 and turn the work so that the right side of the flags are now facing. dc into 2nd ch from the hook and then continue to dc all the way along the length of your previous row, fasten off and darn in the ends


    Voila! Your granny bunting is now ready to adorn your home or garden ~ enjoy!

    Lisa x

    p.s   if you use this pattern and you'd like to showcase your finished item, feel free to upload a photo of it to my Get Smitten Flickr group or the Get Smitten Facebook page where you can join in the chatter and keep up to date with what goes on at Get Smitten here in France  - I'd love to see you there and say hi!

    And if you're currently addicted to Instagram as I am, feel free to tag a photo of your bunting to #getsmitten @lisapocklington
      

    {all images © Lisa Pocklington for Get Smitten using Instagram}


    Thursday, 8 December 2011

    6 Ideas for a Handmade Christmas


     So no doubt by now you've already got the decorations up, the cards written & posted, the presents bought & wrapped and a stash of home made mince pies ready for any unexpected visitors who might just pop by.... no?... me neither!


    Not sure if I've ever been organised for Christmas - it always just kind of creeps up on me and then before I know it, I've left it all too late and I beat myself up over how I should have done it and promise myself it will be different next year. I'm sure I'm not alone here (right??!)


    Part of my problem is that I over commit my time - there are always commissions at this time of year, as well as the private sales I hold locally for my Get Smitten items and I usually have a whole list of gifts I want to make as presents too... not to mention the ideas I have for decorations for the house


    Here's a round up of all the things I wish I had time to make this Christmas...

     First up is the totally gorgeous pompom wreath by Danielle Thompson... oh, I love the colours she has used in this (actually I love most of her work, Danielle is my kitschy vintage heroine!) It took her forever and she recommends using a pompom maker - as opposed to the good old fashioned 2 rings of cardboard way. A lot of work but totally worth it! You can see her Candy Coloured Christmas post here

    A quicker version is the vintage decoration wreath by Georgia Pechez - what a stunning statement piece! I'm totally in love with vintage xmas decs and have a small collection that I started last year - right now I feel too precious about them to hot-glue-gun them to a wreath but I'll keep my eye out for a few bargains on my magpie hunts so that I can make one for next year. The tutorial on how to make it is here at Retro Renovation

     These printed Christmas tree ribbons are ones that I made for a Living etc photoshoot last year, they're really easy to do and you can use whatever text you like. I wanted to re-do them for this year using the lines from The Twelve Days of Christmas and using paler colours, in keeping with my vintage tree decorations like the ones used in Georgia's wreath. The full tutorial for the printed ribbons is here


    Next is the felted Christmas tree from the super talented girls at The Purl Bee, they also do a green stripe version with a white snow-cap but I love the hot neon pink against the white. Simple but so effective. The tutorial for making both versions is here

     Staying with the felt theme, I love the simplicity of these snowball tree decorations, again from The Purl Bee. I like the subtlety of the monochrome but would be tempted to make these in hot neon pink too! The step by step tutorial for making them is here

    And finally, how about some tinsel swizzle sticks for jazzing up your egg-nog! I'm not a massive fan of tinsel (some people need a serious lesson in how to use it effectively... just sayin') but these I love. And they would see you into the New Year party vibe too! The beautifully photographed tutorial is here on Odessa May Society blog

    Are you organised for Christmas? Do you hand make any of your gifts or maybe support indie designers by buying handmade gifts? What amazing tutorials have you seen online that you've earmarked for next year? I'd love to know

    Lisa xx


    {photos in order of appearance by Danielle Thompson, Georgia Pechez, The Purl Bee, Odessa May Society}

    Wednesday, 2 November 2011

    *Tutorial* - Upcycled Knitting Needle Case From Old Jeans and Shrunk Jumper!


    I am a magnet for stray knitting needles and jumpers that get shrunk in the wash... and don't get me wrong, I love that people know they can give these unwanted items to me and that I will put them to good use. I currently have enough random sets of needles to open a shop and so decided to give a full set away to a friend for her birthday... This seemed simple enough until I came to wrap them as a gift, and so was born the upcycled knitting needle case!


    For this project you will need:
    • offcuts of denim from when you cut your jeans into shorts - preferably with a turn-up hem
    • the arm from an old jumper (sweater) - preferably slightly shrunk from the wash
    • thread, scissors, measuring tape, ruler
    • set of knitting needles (I used 9 pairs for my set)
    Let's get started!


    1. First of all take your jeans leg and cut it apart so that you have a front and a back - you only need to use one of these pieces to make the needle case. Then make sure the top, where you chopped them off to make the shorts, is nice and straight as this will be the top of your needle case too. Next place it, with right sides facing, against the arm of your old jumper (as above). Pin together & trim the jumper so that both pieces are the same size - check that the height is tall enough to take the tallest needle in your set!

    Note: if your jeans leg does not have a turn-up hem, make one yourself by turning the bottom hem up approx 12cm (4 3/4") before pinning to the jumper - this is the part that holds the needles in the case so it's pretty important!


    2. Sew around three sides of the case, leaving the top edge open. Secure the ends and turn right side out. Press and slip stitch the open edge closed. My jumper arm had a frilly cuff and so I used this as a decorative feature for the top of my needle case


    3. Lie the case flat and measure how wide it is. Divide this number by the amount of knitting needles you want to store in your case. I had 9 pairs of needles and the width was almost 20cm (8") so I marked along the width at 2cm (3/4") intervals (as above)


    4. Using a tailor's chalk I marked the lines up the length of the fabric to use as sewing guides (as above). Sewing beyond the section that holds the needles in place gives the needle case a quilted effect as well as more stability in general


    5. Next make the tie for your knitting needle case when it is rolled up, use either a left-over strip from the jumper arm, or if there is not enough fabric left, a length of ribbon. To prevent fraying on the jumper arm strip, I folded it in half lengthwise and used a zig-zag stitch on my machine. Pin the tie at the edge, halfway down the needle case at its own central point (as above). You will sew it in place when you sew the relevant dividing line


    6. Sew along your guides - I used thread to match the jumper so that it added a decorative effect on the denim (see above). Be careful to sew the tie in place only once! - move it out of the way as you sew along the other guides!  

    Note: if any of your sewing guidelines are very close to a thick hem on the jean leg, use the zipper foot on your sewing machine to get closer to it


    7.  Place the pairs of knitting needles into the case in size order and simply roll the case up using the tie to secure it. And there you have it! One fab, upcycled, hand-made knitting needle case to keep you company on your knitting adventures during the coming chilly winter evenings!


    I'd love to see how your own version of this project turns out... feel free to upload pics into my Get Smitten Flickr group. And what do you plan on knitting this winter? Have you started already?

    Enjoy!

    Lisa x

    {photos by Lisa Pocklington for Get Smitten, vintage fabric used as backdrop available to buy in the Get Smitten boutique here}

    Sunday, 12 June 2011

    Stripe Mania! Tutorial on making a cute top for summer... with stripes of course


    eek two posts in one day!? Both are time sensitive so you'll just have to flow with me here peeps. I wanted to participate in Holly Becker's Stripe Mania! blogger extravaganza over on uber blog Decor8 but being me it involved a little more than just snapping a pic of myself wearing a stripey top (which was basically the criteria for the job!). I had grand plans of up-cycling two of my unloved vest tops into one cute new summer version and thought I'd share a tutorial on how to do it. It's super easy and you can be wearing it within a half hour! Yep, it's that simple

    There comes a time in a girl's life when tops that skim the midriff are considered dangerous ground; I have reached that time. Not that I have a giant muffin-top (yet!) but I really do feel so much better in something that comes down a little lower. Are you with me on this? I have a small pile of such tops which I still think are lovely but would just never wear any more due to the length.. and so, in true up-cycle fashion, I decided to combine a couple of them into something a little more demure and sophisticated


    You will need:
    • 2 tops that you still love but just don't ever get round to wearing - make sure that when combined they will provide the length you require (otherwise there's no point!)
    • scissors, pins, tape measure and sewing machine

    1 Take the vest top that will become the bottom section of your new item and cut the across the width at the armholes


    2 Take the vest top that will become the top section of your new item and measure down from the armpit for the desired length. Mine was 9cm as I wanted it to end just under the bust


    3 Do this on both sides and then using the tape measure as a guide pin all the way across


    4 Cut along the width approx 1.5cm below your pinned line. This gives you enough fabric for your seam allowance


    5 Turn your new top section inside out and place it over the bottom section. Their right sides should be facing. Be sure to line up the side seams of both as well as the top edges and pin in place all the way around


    6 Carefully sew the seam using whichever stitch your sewing machine recommends for stretch fabrics. Mine is called a triple elastic stitch. If you can't find this info in your manual then use a long and narrow zig-zag stitch so that the fabric can still move once sewn. Press the seams open and then turn right side out

    Tip: use a ball point needle when sewing stretch fabrics on the sewing machine. This is a tip I tell all my sewing students in the Get Smitten creative workshops. It allows the needle to push through the gaps between fibres rather than piercing them and possibly damaging the elastic of the fabric

    et voila! A far more wearable, super cute top. I love to rock the nautical look with a little twist and wear with jean shorts or go a little bit more glam with white skinny jeans and a belted cardigan. All done in less than half an hour with just enough time to pop on a fake knotted belt, my new crocheted fedora hat and take a few silly snap shots outside (before the sun completely disappeared!)

    How do you wear your stripes?

    Lisa x

    {Tutorial photos by Lisa Pocklington, 'snap-shot-not' photos by Jeremy Wilson}

    Monday, 13 December 2010

    *Tutorial* - Christmas Tree Ribbons


    A couple of weeks ago I promised you a tutorial on how to make the printed ribbons that I made for the recent Livingetc shoot. Ironically the giant Christmas tree that we decorated was barely featured in the printed article itself but you can see it in the background of one of the shots!


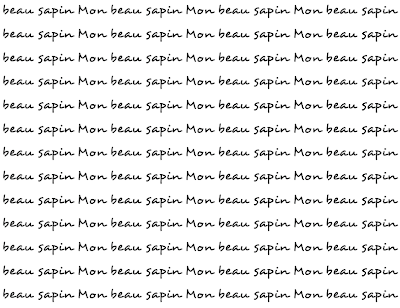
    These are very simple to make and you can get creative with your choice of ribbon colours and of course the text that you print onto them. I chose hot pink, bright turquoise & lilac satin ribbons and the wording, "mon beau sapin" (which means my beautiful Christmas tree in French)


    You will need:
    6 metres of satin ribbon ( I used 2m per colour)
    1 sheet of t-shirt transfer paper for your printer
    a computer, a printer, an iron & a pair of scissors


    Step 1
    Using your computer, type out a page of your chosen wording in your preferred font type. I used font Desyrel in size 22 (to fit the width of the ribbon) and filled the whole page


    Step 2
    Print onto t-shirt transfer paper (make sure you select this in your printer settings so that the text prints out in mirror image). Then cut each set of words out


    Step 3
    Cut the ribbon into 40cm lengths (cut on the diagonal so it makes a point - this stops the ribbon from fraying) and, following the instructions for the transfer paper, carefully iron a set of words at each end, placing them about 2.5cm from the pointed end.


     Step 4
    Once the text is in place, peel away the paper & tie the ribbons on the branches of your Christmas tree!


    et voila! Quelle beau sapin!

    Enjoy,

    Lisa x

    {Livingetc photos by Jeremy Wilson, tutorial photos by Lisa Pocklington}

    Share this post with your friends!

    Related Posts with Thumbnails