Monday, 12 November 2012

Lest We Forget


I felt compelled to do a little more than simply buy a paper poppy pin for Remembrance Sunday this year; I wanted to create a simple and tasteful piece that I can display in the house each year or perhaps on the front door, as you would a Christmas wreath


I began with a lovely, demure vintage fabric from the current Get Smitten vintage fabric fat quarter collection and traced my text directly onto it. I then stretched it tightly in a standard wooden embroidery hoop and used a grey embroidery thread to neatly back stitch over the wording


To tidy up the fabric around the edges so that it can be displayed, I simply used a cotton sewing thread to pull all the edges into the centre at the back so it cannot be seen. And for a professional finish, I cut a piece of grey felt the same size as the inner part of the embroidery hoop and glued it in place to hide all the messy bits


For the glittery poppy, I took apart a paper poppy bought from the lovely people at the British Legion and applied several coats of red, glittery nail polish. This helps to strengthen the poppy and allow it to stand up to a bit more wear and tear if the work is to be displayed on the front door


I count myself fortunate to have never directly known anyone who has given their precious life in war; I truly hope it stays that way and I am grateful to all those brave souls who have made such an incredible sacrifice. I will display my comemorative embroidery with pride and perhaps add an extra poppy to it each year

Lisa x

{All images by Lisa Pocklington for Get Smitten using Instagram - follow me @lisapocklington -  Vintage fabric fat quarter available at Get Smitten on Etsy}

Thursday, 11 October 2012

The Great Big Stitched Postcard Swap 5


This summer I participated in The Great Big Stitched Postcard Swap 5 organised by the lovely Beth Nicholls at the Do What You Love website. This is the second time I have joined in the stitchy fun - you might remember the first time (here) when the theme was Love and I had the pleasure of meeting my swap partners Heather Powers (Textile Designer and Organiser Extra-ordinaire) and Jessica Swift (Pattern Designer and Colour Expert), both living in America


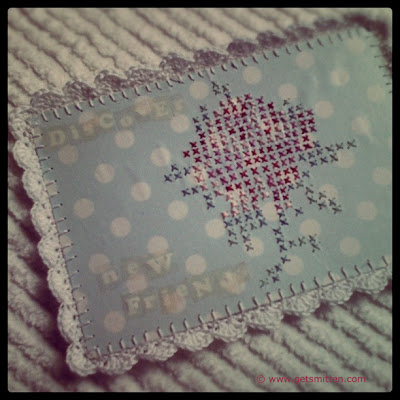
This time the theme was Discover and I used the opportunity to discover a new technique I have been curious to try - cross stitching onto paper. My swap partner was the lovely Katherine Quinn (Illustrator of gorgeous, whimsical characters) across the other side of the world in New Zealand

Leaving it to the last minute as I often do (I always have the best intentions with too many ideas and tend to over commit!) I set about marking my design onto my postcard background with coloured pencils to make it easier to follow. I simplified a cross stitch design of a flower that I found in a vintage embroidery book


To make the stitching part easier, I used a pin to pre-poke (is that even a term?!) the holes in my postcard and then set about with my stitches one colour at a time


Now, I won't lie to you; it really hurt my fingers! I mean really! Pushing the needle through all those holes and often missing the target a couple of times, each time, was a teensy bit tedious but I am delighted with the end result. In fact, I love it!


I decided to give it my trademark crochet border and then added a little text using some vintage Lettraset which I glued on as it was too fragile to transfer.

One of the best parts about participating in a swap is that you get to meet other like minded people from all over world, and so the wording I chose for my text is "Discover new friends". I'm still in touch with both Jessica and Heather from last year and I hope to strike up a lasting friendship with Katherine too - she wrote a lovely. friendly message on the back of her postcard, as if we had been friends for years, just catching up. Here's the back of mine; I hid the reverse of the stitching with a piece of white cotton before I worked the crochet border and wrote my mesage on it with a ball point pen


I did plan to send my postcard directly in the post - like Jessica did with hers last year - but right at the last minute (and influenced by the gasps of horror from my sister!) I decided to enclose it safely in an envelope so that it arrived in New Zealand unscathed by the postal system!

So would I use this technique again? Yes; infact I have a couple of ideas lurking already for how I would like to use it. I would like to learn the magical trick that is using embroidery floss without getting into a hideous tangle - something I've never managed to perfect despite my degree in textiles!

And, of course, I'll be looking forward to Beth's next Great Big Stitched Postcard Swap too. You can find out more about that here and sign up to be notified when it takes place

Lisa x

Thursday, 20 September 2012

A Reason, A Season or a Lifetime vs Why?!


Sometimes there's simply no denying that life can slap you round the face with a wet fish; you think things are going along fine and then suddenly, out of the blue... Wham! someone's actions knock you for six. You feel hurt, humiliated, angry, unvalued, numb and incredulous. You question things. You question everything

Why?! is usually the first reaction and in most cases a valid question. Sometimes there is an answer; most times there isn't. It's an unpleasant and hideously dificult place to be; this no man's land of unanswered questions. Our minds are wired to find solutions, reasons and answers and they have an unchecked habit of 'creating' answers themselves if left to their own devices. This is usually a bad thing, that much I can tell you!

I am learning some particularly harsh life lessons at the moment; I suppose it's all part of the huge changes I have made recently and I'm quite sure there is more to come! It really is time for me to practice what I preach, take a step back, presence myself and look deeper to see what the truth of the message is really about. I won't lie to you; it's not easy

A lovely friend of mine sent me this message just as I was being slapped with the wet fish; it has helped me see passed the disatisfaction of the basic, reactionary Why?! I'd like to share it with you and hope that it may help you too someday

Lisa x

People come into your life for a reason, a season or a lifetime

When someone is in your life for a REASON, it is usually to meet a need you have expressed. They have come to assist you through a difficulty, to provide you with guidance and support, to aid you physically, emotionally or spiritually. They may seem like a godsend - and they are! They are there for the reason for which you need them. Then, without any wrong doing on your part, or at an inconvenient time, this person will say or do something to bring the relationaship to an end. Sometimes they die, sometimes they walk away, sometimes they act up and force you to make a stand. What we must realise is that our need has been met, our desire fulfilled - their work is done. The prayer you sent up has been answered and now it is time to move on


When people come into your life for a SEASON, it is because your turn has come to share, to grow or to learn. They bring you an experience of peace or make you laugh, they may teach you something you have never before done. They usually give you an unbelievable amount of joy. Believe it! It is real! But only for a season


LIFETIME relationships teach you lifetime lessons, things you must build upon in order to have a solid emotional foundation. Your job is to accept the lesson, love the person and put what you have learned to use in all other relatonships and areas of your life. It is said that love is blind but friendship is clairvoyant


Thank you for being part of my life


ANON

 {image of photo art locket by Irene Suchocki - available to buy at her gorgeous Etsy store Eye Poetry Photography. Seriously dreamy stuff; go see!}

Thursday, 6 September 2012

*Designer* - FREE Crochet iPad Cover Tutorial


Want to glam up your iPad? I'm a big believer in making practical things pretty, and if it gives me the excuse to whip my crochet hook out, then all the better as far as I'm concerned! I was playing around with stitch combinations after flicking through a vintage pattern book and my favourite feeds on Instagram and this is what I came up with; it's a basic ripple and fan stitch that uses colour and ridged texture for maximum effect. And this is my current colour obsession: grey, silver and blush


For this project you will need
  • 1 ball each of dk yarn in your choice of colours (I chose 3 and alternated them every 2 rows but you could have as many or as few as you wish. You could even change to a new colour every pattern repeat - rows 3-6 - as shown in the lower sample of the image below and use this as a stash busting project!)
  • 1 crochet hook size 3.5mm or E
  • a large eyed yarn needle to sew up the side at the end
    Please note that this tutorial uses British crochet terminology throughout, so here is a quick translation guide for any of my lovely US friends who wish to make one too!

    dc (double crochet) = sc (single crochet) in US
    tr (treble) = dc (double crochet) in US
    dtr (double treble) = tr (treble) in US


    Let's get started!
    Note: rows 1 and 2 form the ripple shape and rows 3-6 are the pattern repeat. I changed colour every 2 rows in my sequence of 3 colours. I worked into the back loops only with each colour change to enhance the pattern and create a raised, textured effect. The tutorial below instructs for this but you can ignore these extra bits if you like and work to your own colour sequence or keep the work flat rather than raised. The choice is yours!

    For your foundation row ch91
    1. dc in 2nd ch from hook, dc in next 3sts, *3dc in next st, dc in next 8sts. Repeat from * 8 times, 3dc in next st, dc in next 4sts to end. ch1 turn

    2. Skip first dc, *dc into next 4sts, 3dc into next st, dc into next 4sts, skip 2sts. Repeat from * to end. ch1 turn


    3. slst into next 3sts, {change colour here as shown in image above} ch3 (represents a treble) then working into back loops only, tr into next 2sts, *3dtr into next st, tr into next 3sts, skip 4sts, tr into next 3sts. Repeat from * to end. ch1 turn

    4. dc in next 4sts, *3dc in next st, dc in next 8sts. Repeat from * to end. ch1 turn

    5. {change colour here} Working into the back loops only, skip 1st st, *dc in next 4sts, 3dc in next st, dc  in next 4sts, skip 2sts. Repeat from * to end. ch1 turn

    6. Repeat row 5 but work into both loops

    7. Repeat rows 3-6 until the work measures 29cm - ideally ending in the same colour as the first row


    To make up
    • Darn in any ends from your colour changes (tip: I crochet over the ends of my colour changes as I go, in order to save myself this tedious task - you should try it!) and block press the work gently with an iron 
    • Fold the work in half with right sides facing and using the corresponding colour yarn, dc along the bottom edge
    • Take a length of the same yarn with the yarn needle and sew the side edge together using a back st. I followed the line of the narrowest part of the ripple width so that the edge remains straight
    • Sew in the ends, turn the cover right side out and slip it over your iPad!
    et voila! One incredibly gorgeous and rather glamorous, crochet iPad cover!


    What colours did you use? How did you work your stripe combination or did you use just one colour? I'd love to see what you made... please come on over to the Get Smitten Facebook Page and show me your work. We can all ooh and aaah over your scrummy crochet goodness and we can connect over all things crochet, handmade and vintage!

    And whilst you're there, would you mind hitting the 'Like' button too? I would hugely appreciate your support, feedback and suggestions for other patterns for the Get Smitten library. Plus, you'll be the first to hear about any new pattern releases and other fun projects that I organise


    And if you happen to be reading this and are unable to crochet or simply don't have the time to rustle an iPad cover up yourself, you can always place an order for your very own one made by me! Pop over to my Etsy store here and we can discuss your perfect colour choice. It would make a great Christmas prezzie or back to uni gift: just sayin'!

    Plus, I really love to make them! It keeps me out of mischief!

    Lisa x

    {all images by Lisa Pocklington using Instagram Please respect intellectual property and do not sell this pattern. You are welcome to spread the word about this pattern tutorial far and wide providing you link back to this page and credit me as the designer. I hugely appreciate your honesty, thanks!}

    Tuesday, 28 August 2012

    *Stylist* - Elle Decoration UK


    Oh my, what a rollercoaster of a month or two it has been. I feel as though I've been through the spin cycle of a washing machine; I am bedraggled, if that's even a word! I hope its not too late for you to scan through a copy of the current Elle Decoration UK (September issue) to see the gorgeous Paris apartment we shot earlier this year. Despite having had my work published many times before, this one really brought a smile to my face. Here are a few scans of the 8 page spread


    So many incredible design classics and divine antique pieces to drool over; it was a pleasure to work on and I look forward to collaborating again with the interior designer, Marianne Tiegen. We have a few ideas in the pipeline!


    I treated myself to a sweet little neon peach cardi to celebrate!

    Lisa x

    {images by Lisa Pocklington, original photos - with permission - by Jeremy Wilson}

    Saturday, 21 July 2012

    *Magpie* - Candy Coloured Vintage Sewing Notions


    It's the weekend (yay!) and so I thought I'd follow on from my last post with something a little more light hearted. Thank you to everyone who sent me a lovely message of support and encouragement by the way, and apologies for making so many of you cry!

    These are some pics I took a few months ago at an old haberdashery shop near where my parents live. I love visiting as it is full of all those old glass fronted cabinets and shelves upon shelves of ribbons and trims. Tucked around the back corner is a wall of little, tattered, cardboard boxes full of buttons, all arranged in colour order with one of each attached to the front and scribbled out prices in faded pencil


    My favourite section, the place I head straight for every time, is full of pretty, pastel coloured trimmings wound around worn-out, cardboard holders. It has guipure lace, cotton crochet and ruffled tulle all a little bit grubby and faded from time. This stock has sat there virtually untouched for the entire 20 odd years I've been going there; it is now officially vintage! I find an excuse to buy a few meters from time to time; it's hard to come by the real deal these days and I so love the way they are displayed


    I'd like to tell you that the shop keeper is a plump, rosy-cheeked, smiley lady who sits with her knitting and is keen to help you find the perfect button for your latest project (because that's how it is in my little happy crafting fantasy); but sadly not so, which is a huge shame as I would have liked to chat with her a while and learn about how the industry has changed over the years she has been in business.

    I'd like to have chatted about what it would have been like when she first opened and when people made their own clothes and homewares. And what gems the haberdashery salesmen would have offered in terms of stock. I would like to have had the courage to ask her if she'd sell me some of her old stock of guipure lace, cotton crochet and ruffled tulle still on the tatty carboard holders, but in all honesty it woud be like reaching out to try to stroke a rabid dog


    The shop is closing this weekend, so I suppose I have lost my chance for a peek into this world of colour-coded, tactile treasures. There is rumour that the whole inventory of stock has been purchased ~ I wonder (read: hope) that a new version of the shop might open and that there will still be somewhere for me to admire all those rows of dreamy haberdashery goodness! And if not, well I'm glad I took these photos and I can always organise my own stock of trims, buttons and notions in the same way!

    Goodbye Button Boutique!

    Do you have a local old fashioned haberdashery store near you? What's your favourite section there? Is the shop keeper a friendly soul?!

    Lisa x

    Thursday, 19 July 2012

    Hello? Destiny Calling...


    I have been standing at a crossroads for quite some time; lost, confused and without a sense of direction. I have been able to see far, far away in the distance, a small glimmer of where I think I need to be; I've heard tell of how wonderful it is there but from where I stood there was no obvious route to take, no instructions of how to get that far, no hope that I might ever get there

    Over the years I have tried various routes I thought might get me there, only to meet with dead-ends, immovable obstacles and bottomless pits. I have searched high and low for that handy life map other people seem to have been given, wondering how I could have misplaced something so precious; wondering if I ever was given one

    I sat; alone, afraid and desperate; watching years pass by and panicking that I was missing everything. I ran and I ran; but what use is running when you don't know how to get where you want to be? I exhausted myself and almost gave up

    And whilst lying there, in the dark shadows of unfulfillment, I heard a little voice from deep inside. A voice from inside my heart. It asked me what I really wanted, what my deepest desires were and what life would feel like if I had these things. It told me to trust it and listen to it and believe in it. And I did

    Do you remember this post from the beginning of the year about chosing a word to define your year ahead? I chose Clarity and Purpose:

    "And this is why I have chosen Clarity as my word of the year for 2012. It is time to get clear on what my destiny is, make some decisions and take some action. I have been wandering aimlessly for too long and life feels too short to live that way

    I also have a feeling that once clarity has done its work, the real changes will happen fast and so I am offering myself a second word to use in its place, when the time is right. That word is Purpose. It's time to live life with purpose and on purpose, but first I need the clarity with which to do that
    "

    I hadn't put a time frame around when Clarity would shift to Purpose but on reflection I realise it happened within the first six months of the year. I made the seemingly impossible decision to start a new life for myself in June and the photo at the top of this post is the one I took to mark the occasion ~ I felt it deserved freshly painted toes and my new frock!

    I have done a lot of crying; but they are not tears of fear, or confusion, or helplessness, or despair. They are tears of relief, of sorrow and of letting go. Throughout the last 6 weeks of packing up my life and letting go of something/someone so precious to me I have felt calm and secure in my trust that I'm doing the right thing; it's almost eerie. The chatter of doubt and confusion has been silenced and I feel peaceful at last

    And so here I am, finally walking with confidence toward those glimmering lights; a skip in  my step and a smile on my face.  Those stagnant crossroads feel far behind me now and things are moving so quickly I feel as though I stuck out my thumb and have hitched a ride on a bus marked Destiny!

    I know I'm finally on the right path; I know because I have clarity as my map and my heart as my compass

    Exciting times ahead! I hope you'll join me

    Lisa x

    Share this post with your friends!

    Related Posts with Thumbnails