Monday, 4 June 2012

Brit Brit Hooray! It's The Queen's Jubilee!


Have you been enjoying the diamond jubilee holiday weekend? Bunting, brollies and good old British spirit has enveloped the UK from what I have seen across the internet and telly - it's made me feel quite homesick!


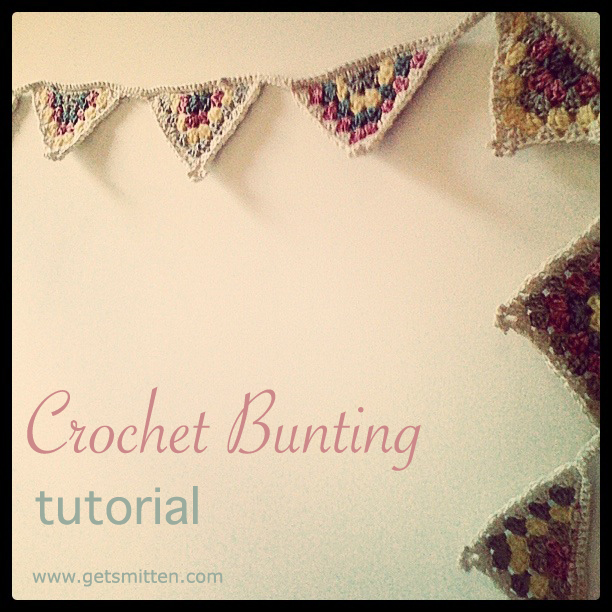
My Brit Brit Hooray! union jack cushion pattern (top) has been selling well of late, I made this vintage fabric version in the Get Smitten colour palette so that it sits nicely in my studio and I also have my crochet bunting up in here too. If you didn't catch the post, there is a step by step tutorial on how to make it here


I also have on display a beautiful commemorative mug from the 1977 Silver Jubilee which I picked up a few years ago, before I even realised that there was a jubilee coming up! I was taken with the elegant shape of the mug and the soft colours of the transfer, subtly enhanced by gold filigree. I think her Maj looks lovely with some sweet, garden flowers up top - although she does have a leaky bottom and I've had to put a small glass jar inside for the water!


The only other memorabilia of this Diamond Jubilee I have succumbed to is this tin from Marks & Spencer - they did a range of three designs and I fell for the vintage feel of this silhouette one. The shortbread was exceptionally tasty too! I am also trying to convince a shop owner to part with a small vintage tin from their window display - it's from the Queen's Coronation and is so incredibly pretty... I'll keep you posted on that one if I have success! Oh and a few bits of patriotic ribbon that I've not decided what to do with yet!


Here in the Alps we were blessed with fabulous weather on Saturday and so a few of us expats gathered to eat cucumber sarnies (which got toasted by the sun!), Victoria sponge cake, strawberries and cream scones. Finally an excuse to wear a pretty summer frock and a tiara! Do you like my red and blue nails?!


It's funny, I have no recolection whatsoever of the Golden Jubilee, nor have I seen any memorabilia for it in my recent magpie adventures, hunting for vintage treasures. The 1977 celebrations seem to be the one most of us remember. I dug out some wonderfully nostalgic photos of our little street party, held at a neighbour's house; looks like we were blessed with decent weather that English summer!


That's me, the tiny blonde with the white top and bandy legs eyeing up the cocktail sausages on a stick. I love in the last photo how I'm stuffing my face - and check out that gorgeous A-line zig zag skirt on the lady behind me. Vintage-tastic goodness!


What have you been up to for the Diamond Jubilee? I'll leave you with this farewell Royal wave from Her Maj The Queen and Prince Philip from the marvellous book, Knit Your Own Royal Wedding by Fiona Goble

Lisa x

Friday, 11 May 2012

Crochet Bunting Tutorial


I have bunting on the brain at the moment; my head is filled with ideas on how to make seriously gorgeous, yet oh-so-easy-peasy garlands of decorative goodness. I'm starting this mini series of bunting how-tos with a tutorial on how to crochet some granny bunting. I use the term granny, as it refers to the style of crochet technique used to make the ubiquitous Granny Square - famous in every 1970s crochet afghan throw. It is a super easy and versatile technique which lends itself just as well to straight rows, chevrons, rounds, hexagons and triangles


This is a great stash busting project as you can make it as multicoloured as you wish, changing colour at the beginning of each row. It works best if you use the same colour yarn for the final round as well as for the top row that joins all the flags together. In this tutorial I will be using the method of creating half a square motif - always handy to get your head around for when you are making blankets or other items that may require halves of your main block to fill in gaps on edges


This pattern is written in UK crochet terminology, so to assist my lovely friends from the US here is a quick translation guide:

sc (single crochet) = ss (slip stitch) in US
dc (double crochet) = sc (single crochet) in US
htr (half treble) = hdc (half double crochet) in US
tr (treble) = dc (double crochet) in US

Get Smitten Crochet Granny Bunting!

Begin by creating a magic ring and work 3ch (represents 1tr), 3tr, 1ch, 4tr into it, fasten off leaving a 5cm / 2" tail

ch3 (represents 1tr), then 3tr into the same stitch, skip 3tr, work (3tr, 1ch, 3tr) into the space, skip 3tr, 4tr into last tr of previous row, fasten off leaving a 5cm / 2" tail

ch3 (represents 1tr), then 3tr into the same stitch, skip 3tr, 3tr into next space, skip 3tr, work (3tr, 1ch, 3tr) into the space, skip 3tr, 3 tr into the next space, 4tr into last tr of previous row, fasten off leaving a 5cm / 2" tail

Repeat this row, working 3tr into the spaces and (3tr, 1ch, 3tr) into the central 1ch space, until you have 4 rows. Don't forget to change colour for each row!


For the final round - remember this looks best if you use the same yarn as the one you will use to join all the granny flags together -  we are going to add a decorative picot to the centre point as follows. ch3 (represents 1tr), then 3tr into the same stitch, (skip 3tr, 3tr into next space) 3 times, skip 3tr, work (3tr, 3ch, sc into the 3rd ch from hook, 5ch, sc into 5th ch from hook, 3ch, sc into the 3rd ch from hook, 3tr) into the 1ch space, (skip 3tr, 3tr into next space) 3 times, 4tr into last tr of previous row, fasten off leaving a 5cm / 2" tail


Repeat the above until you have as many flags as you want for the length of your bunting - I made 8. This is where you can add some variety to your bunting by mixing up the colour order on the rows each time. I used 4 colours to make mine and changed the order they appeared in on each of the 8 flags (but always keeping the final row the same colour for continuity). If you don't like the idea of changing colour too much, why not make each flag in one colour? You could use a bold 2 colour combo for a nautical look, a graded version of one colour for an on trend, ombre effect, or how about a rainbow if you added on another 3 rows to accommodate all 7 colours? I am going to make a red, white and blue version next for the Queen's Jubilee celebrations!


To join your flags together, and using the same yarn as for your final row with the picot detail, start by ch25, and with the back of the flag facing you, insert the hook into the first loop of the 3tr post on your first flag and make a dc (what we are going to do here is work across the top of our flags, using the loops of the trebles that are now lying on their sides). Work 1dc evenly across the length of your flag into each available loop - numbers are not important here, just try to keep it looking evenly spaced. It looks best if you work into a loop rather than simply over the whole treble as it lies on its side, otherwise it can look a bit too holey.

Tip: as you work this row, dc over the coloured ends from all the other rows as you go, it will save you a lot of time darning in the ends later! You can snip them shorter once you have dc'd over them a few times, to make it less bulky


When you reach the end of the first flag, ch6, then join your second flag as above. Continue in this manner until all your flags are joined with a dc across the top and 6ch inbetween. ch26 and turn the work so that the right side of the flags are now facing. dc into 2nd ch from the hook and then continue to dc all the way along the length of your previous row, fasten off and darn in the ends


Voila! Your granny bunting is now ready to adorn your home or garden ~ enjoy!

Lisa x

p.s   if you use this pattern and you'd like to showcase your finished item, feel free to upload a photo of it to my Get Smitten Flickr group or the Get Smitten Facebook page where you can join in the chatter and keep up to date with what goes on at Get Smitten here in France  - I'd love to see you there and say hi!

And if you're currently addicted to Instagram as I am, feel free to tag a photo of your bunting to #getsmitten @lisapocklington
  

{all images © Lisa Pocklington for Get Smitten using Instagram}


Wednesday, 9 May 2012

*Designer* - New Retro Soft Toy Pattern at Get Smitten


Let me introduce to Rory Lion and his friends! They love to have fun adventures together and are inseparable, which is why I have included the step by step instructions to make all four members of the gang in my latest pattern release at Get Smitten!

Rory is quite bossy; the leader of the gang. He is caring, loyal and loves to dance and sing. He goes out of his way to be centre of attention and his favourite crisps (that's potato chips to my American friends) are Cheese and Onion flavour

Barney Lamb is happy-go-lucky and follows Rory wherever he goes. He is very good at Maths and jumping and he loves remote controlled cars. One day he would like to visit New Zealand

Squealia Piglet is very excitable and has to fight the urge to squeal nearly all the time. She loves arts & crafts and sometimes gets in a right mess with all her paints & crayons. Her favourite colour is pink and she has a very curly, spiral crocheted tail!

Miss Bunnie-Penny is quite timid but very, very caring. She is helpful & kind and is always available for cuddles. You can tell her all your worries & she will make you feel better just by being there. She dreams of having her own chat show like Oprah & she loves lollipops. She has the most beautiful tail you ever saw on a rabbit


I had great fun designing these guys - I wanted to capture the carefree innocence of childhood friendships and have their expressions reflect this. I love the naivety of their faces, both in terms of expression and in construction - the large eyes appeal to younger kids and the long gangley limbs give little hands something to hold on to. I kept the shape simple so that sewists of all ages and experience could make them and the pattern can be made by hand or machine, as there are no difficult sections to trip you up. The character of the animals is added with crochet details and the pattern contains full step by step instructions on how to make these defining elements


I also wanted to give Rory and his buddies a kitschy, retro vibe - like the kind of toys I remember seeing in my Mum's crafting books of the 70s. I have used a selection of mismatched vintage fabrics with bold floral patterns to help achieve this look. If you want to do the same, you'll find a great selection of vintage fabric fat quarters here
Preview


I recommend adding a little bit of lavender to the body just before you stuff it so that the toy has a calming and relaxing affect on children at bedtime - the scent is released as you give your cute, new friend a good night hug!

The pattern is available at the bargain price of €5.00 in my Get Smitten Etsy store right here

Happy sewing!

Lisa xx

p.s  if you happen to make any of these guys from my pattern, you are most welcome to upload your photos to my Get Smitten Flickr group or my Get Smitten Facebook page so that we can all get a load of the cuteness!

{all images © Lisa Pocklington for Get Smitten using Instagram on iphone 3G}


Friday, 27 April 2012

That's Pinteresting!


You may have been hiding under a mossy rock if you haven't heard somebody mention Pinterest recently; it seems to have suddenly gone mahoosive! Being a very visually inspired person myself, I have found it to be invaluable in my site-hopping-inspiration-gathering adventures online. Previously I would bookmark a page within my Inspirations bookmark folder or save images with source referenced titles into my Inspirations folder on my desktop; all quite long-winded, especially when you come to access said inspirations during a lightbulb moment of creativity. So for me, Pinterest has been a real gem. I love having the little Pin It button on my browser menu bar so that whenever I spot an image that sparks an idea or simply that I just love, I can have it logged onto a Pinterest pin board in a couple of clicks


My current list of pin boards includes: Crochet, Quotes and Words of Wisdom, Floral Inspirations, Liberty Love, Vintage Fabrics, Sewing Notions and Natural Beauty


I have been fairly restrained on time spent browsing Pinterest itself as I could rather easily loose swathes of time - I'm talking weeks here! For me it's more about storing images that I wish to return to quickly and easily and I love how the boards are laid out too. It really is a visual smorgasboard of inspiration!


I still tear out inspirational images from magazines from time to time - there is something very satisfying about a mood board or ideas journal or sketchbook. I like tactile!


I have been doing a lot of work recently around what I want my life and future to be; it feels like exciting times are just around the corner. Part of this work is to envision certain aspects in great detail - what does it look and feel like? How does it make me feel to have or be that? What is my ideal scenario? I will use Pinterest to help with this - an online version of a vision board, as the internet is chock full of images, quotes and ideas that can help beef out these daydreams

I am going to start with a board for my business, Get Smitten and my dream studio to run it from!

Do you use Pinterest? Let's connect; my username is Lisa Pocklington - pop your email address in a comment below if you'd like an invitation to join the Pinterest party. Or do you prefer the traditional methods of gathering inspiration? How do you gather your inspiration and creative ideas? I'm curious

Lisa x

p.s. if you're still confused - check out the Pinterest About page for a detailed description of what all the fuss is about!

Friday, 20 April 2012

*Magpie* - A Most Marvellous Vintage Haven


On my last visit to the UK, I spent many happy hours with my Mum browsing around a new vintage emporium called Most Marvellous. It's a huge old warehouse type building in the town of Northampton, packed to the rafters with vintage goodness galore! The main hall houses everything from antiques, collectibles, furniture and bric-a-brac to handmade arts and crafts, all laid out in easy to view units and settings. The rest of the place is divided into concessions run by indie designers and other purveyors of fine vintage collections.


My favourites were Tally Ho Vintage; a beautifully curated selection of clothing and accessories from the 40s through to the 80s, and Grace Face; a local designer who makes the most gorgeous summer dresses from vintage floral sheets - perfect for twirling around the lawn with a Pimms in hand!


There are so many nooks and crannies to explore at Most Marvellous, to the left of the main hall is a cheeky corridor leading to a tiny, one customer at a time hairdressers, a florist and a vintage haberdashery department! Yes, that's right, I said vintage haberdashery! Most marvellous indeed! There were buttons, perfectly packaged in colour order (my absolute fave kind of order!) spools of chunky ric-rac, old sewing patterns, odd balls of yarn and doilies!


To the far right of the main hall, via the Retro Room full of funky records and posters, is wholefood cafe and cake shop, Nanna's Kitchen. This is the perfect refueling stop as they serve up delicious home made fare, guaranteed to fill you up. The sandwiches are giant doorstops and the tea comes in an array of big, mismatched mugs - just like a good cuppa should! I was too busy filling my face to remember to take a pic!


The underground gallery houses books and artwork from local makers as well as the So So Holistic Centre which offers a full range of divine sounding treatments to realign your shopped-out being! And, these guys really have thought of everything, The Marvellous Mini's offers creative art workshops for kids as well as Make It Marvevllous for creative grown ups too

I believe they also hold the odd yard sale on certain weekends and public holidays - so if you live nearby {cough, Mum} keep an eye out for notice of that! I also heard on the grapevine that Most Marvellous is opening a sister store in the not too far away town of Towcester and so my inner magpie is pretty excited to get my geek on again soon


Are you wondering what I bought? I was quite restrained to be honest (a downside of travelling with just hand-luggage on a flight!) and came away with the beautiful doily set pictured above, an Elsie Sparrow rose brooch (below) and the glittery cardi used as a styling prop in the above shot of my lovely friend H's bedroom


Their website is under construction but still worth a visit for info, and you can find the Most Marvellous vintage emporium on Abingdon Square Island, 22 - 36 Kettering Rd, Northampton, NN1 1AH - I cannot wait for my next visit!

Lisa x

{all images © Lisa Pocklington for Get Smitten using Instagram}

Sunday, 15 April 2012

Lazy Sunday Crafternoon


Despite waking up to snow this morning (!!) I've had a very lovely lazy Sunday today, kicked off by a bit of Pilates and followed by a rather cheeky breakfast of American style pancakes with scrambled eggs, crispy bacon and lashings of maple syrup! Seriously divine

I have the inlaws here for a couple of days (hence the elaborate breckie) and we dragged them around a couple of nearby Brocantes, which yielded a few new treasures. I'll let the images speak for themselves!


Here's my haul: a vintage pillow slip, a rusty alarm clock (been looking for one as a styling prop for ages), some vintage lace and a couple of books (again to use as props). I couldn't resist the Parti de Liverpool as that's where I'm originally from! I'm still thinking about the very gorgeous, floral painted sewing machine... why, why, why didn't I buy it??!! I wonder if the vendor will be at the Brocante next weekend too. I have my fingers crossed; such a beauty!


The snow soon turned to grey drizzle, so I spent the rest of the day flicking through the latest issue of my new favourite magazine; Mollie Makes. Have you read it yet? I love the mix of handmade, vintage and style - it's a far cry from most of the craft interest mags out there in terms of trends and style and is always packed full of great ideas. Check out the website here to see what I mean

And with my knitting escapades currently occupying a lot of my spare time, I took the opportunity to learn from a master. MIL is a great knitter and so I asked her to show me a few tricks and tips in the hopes that I can make it look as effortless as she (and let's face it, everyone else) makes it look! Breaking each manoeuvre into slow motion steps is quite tricky when you are used to going at full speed; I remember doing the same thing when I first began teaching crochet workshops. But with some persistence and a few awkward finger movements I am finally able to knit without having to take my whole hand off the needle to wrap the wool around each stitch, hooray!

What did you get up to today?

Lisa x

Wednesday, 11 April 2012

A Chocolatey Aftermath!


Just checking in on you to see that you had a lovely Easter weekend! I was organised enough for once to actually get some festive decorations going around the house - quite pleased with myself as I often feel as though I spend too much time chasing my tail!


I gathered some willow branches from down by the river and popped them into a tall vase - some still had the soft, silvery buds that remind me of rabbit paws while others had already burst into a fuzzy yellow haze! I'm very much loving the yellow and grey colour combo these days and with the added pop of pink from my kitschy, rabbit candle and most creative, handmade card from my niece, I think it gives off a pretty, Easter-y vibe!


I also had a table centrepiece combining my favourite spring bulbs in vintage clay pots. They all came into bloom just in time and although now looking a little passed it, they still smell wonderful - there are Hyacinths, mini daffs and some tiny blue Muscari. I'm going to plant them in the communal garden at the front of the house so that they come up for next spring too


We didn't go too crazy on the chocolate this year - in fact most of it came courtesy of my family in the delicious form of Cadbury Mini Eggs; a serious weekness of mine! Typically, JW scoffed his quota in record time while I am still hoarding a secret few of mine to make them last! We have been feasting on my homemade Hot Cross Buns though - I used cranberries rather than raisins and added some orange essence into the mixture for the crosses - very tasty when toasted and washed down with a nice cup of tea!


And of course the slightly demented looking crochet bunnies were on an international journey to their new homes with my nieces. I think they'll be very happy there


Hope you had a great holiday weekend!

Lisa
x

{all images © Lisa Pocklington for Get Smitten using Instagram}

Share this post with your friends!

Related Posts with Thumbnails